
Setting up an efficient system for printing postage labels all starts with your hardware. The choice boils down to two paths: using a standard office printer or investing in a specialised thermal printer. You can get by with an inkjet or laser printer, but anyone shipping more than a handful of parcels a week will find a dedicated thermal printer is faster, cheaper to run, and more reliable.
Think of your printer as the engine of your shipping station. It sets the pace for how quickly you can get orders out the door, directly impacts your running costs, and affects the professional look of your packages. Making the right call here from the beginning saves a lot of headaches and money down the road. The best choice for you depends almost entirely on your current shipping volume and where you see your business going.
Most new businesses start with what they already have: a standard office printer. It’s a common entry point. You can print a postage label on plain A4 paper, grab the scissors, and tape it to the box. A slightly more refined approach uses integrated A4 label sheets, which feature one or more peel-off labels on a single page.
This method is fine when you’re just starting out. A small Etsy shop shipping five parcels a week can manage perfectly well. The problem is, the costs creep up on you. Ink and toner are notoriously expensive, and printing a single label on a whole A4 sheet feels wasteful. It’s also slow, involving manual cutting or fiddling with alignment on those integrated sheets. As soon as you start to scale, this process becomes a real bottleneck.
For any business that’s serious about shipping, a thermal printer is the undisputed industry standard. These machines don’t use a single drop of ink or a grain of toner. They use a heated printhead to create the image directly on specially treated labels. This technology is the main reason the global label printer market was valued at around $2.34 billion in 2024 and continues to grow. It’s a clear signal that businesses are moving towards more cost-effective and dependable printing for high-volume work.
There are two types of thermal printers you’ll come across:
The real advantage with a direct thermal printer is the combination of speed and low cost-per-label. An online store processing hundreds of orders a week can fire out a crisp 4×6 inch label in a couple of seconds. Trying to do that on an inkjet would be slow, frustrating, and incredibly expensive.
Here’s a quick comparison of the main printer technologies to help you visualise the differences.
Choosing the right hardware can feel daunting, but breaking it down by technology makes it much clearer. This table compares the most common printer types to help you match the hardware to your shipping volume and budget.
| Feature | Direct Thermal Printer | Thermal Transfer Printer | Inkjet/Laser Printer |
|---|---|---|---|
| Best For | High-volume shipping, postage | Product labels, long-term storage | Very low-volume, occasional shipping |
| Running Costs | Very low (labels only) | Low (labels & ribbons) | High (ink/toner, paper/sheets) |
| Print Speed | Very fast (2-8 inches per second) | Fast | Slow |
| Durability | Good for shipping; can fade | Excellent; resists heat & light | Varies; susceptible to moisture |
| Simplicity | Easiest to use; one consumable | Requires loading labels and ribbons | Prone to jams, manual cutting needed |
Thermal printers offer a purpose-built solution that pays for itself in time and savings as your business grows. Inkjets and lasers are a starting point, but not a long-term strategy for efficient shipping.
Your shipping volume is the clearest indicator. An artisan producer sending out 10-20 orders a week might be fine starting with a good laser printer and integrated labels. The moment you find yourself processing 10-15 orders every day, the time and money you’re pouring into ink and A4 sheets make a thermal printer a very smart investment.
Another factor is resolution, measured in Dots Per Inch (DPI). Most standard thermal printers offer 203 DPI, which is more than enough for clear addresses and scannable barcodes. If your labels are smaller or include fine-print details and logos, a 300 DPI printer will give you that extra sharpness, making certain every single barcode scans perfectly the first time.
Once you’ve got your printer sorted, the next piece of the puzzle is the supplies you feed it. The labels themselves are more than just sticky paper; they’re your parcel’s passport. Everything needed to get it from your warehouse to your customer’s doorstep is on that one small rectangle. Trying to save a few quid on poor-quality labels is a false economy that often leads to lost parcels and frustrated customers.
The material your label is made from determines how well it holds up on its journey. For most standard domestic shipments in cardboard boxes or poly mailers, a simple paper label is fine. It’s cheap, cheerful, and gets the job done.
What happens when your parcels face a tougher trip? If you’re sending goods internationally or shipping items that might be exposed to the elements, a more durable material like polyester is a much smarter bet. A polyester label can shrug off moisture, scuffs, and tearing far better than its paper counterpart. Think about a company shipping frozen goods – they need a label that won’t turn to mush from condensation. On the other side, a bookshop sending paperbacks can get by perfectly well with standard paper labels.
The adhesive on the back of the label is just as significant as the material on the front. It needs to create a solid bond with whatever packaging you’re using. For most corrugated boxes and paper envelopes, a standard permanent adhesive is all you need.
If you’re a fan of those ubiquitous grey poly mailers, you might notice that some labels don’t grip quite as well. It’s always worth doing a quick test to see if the corners start to peel away. For anything shipped in temperature-controlled packaging, like chilled foods, you’ll need a specialised adhesive that’s built to work in cold, damp conditions.
The most common size you’ll see for postage labels is 4 x 6 inches (roughly 10 x 15 cm). There’s a good reason this has become the industry standard. It’s the perfect size to clearly display all the critical information:
Almost every shipping platform and courier, from Royal Mail and Evri to DPD, defaults to this 4×6 inch format. Sticking with the standard makes everything easier, from buying your supplies to setting up your printer software.
How your labels are supplied depends entirely on the printer you’re using. This choice has a direct impact on your day-to-day efficiency and how you manage your stock.
The choice between roll and fanfold labels often comes down to personal preference and how your workspace is laid out. Both are vastly more efficient than fiddling with A4 sheets, making them the go-to for any business that ships regularly. You can explore the different types of labels for printing postage to find the ideal match for your operation.
The most efficient hardware is only half the story when it comes to printing postage labels. The other, equally crucial part is the software that acts as the digital bridge between your online shop and your couriers. This is where you’ll manage orders, buy postage, and generate the actual labels. Get this connection right, and you’ll transform a tedious, one-by-one task into a swift, automated workflow.
For businesses here in the UK, your software choices generally fall into two camps. You can either use the tools offered directly by the couriers themselves, or you can opt for a multi-carrier platform that pulls all your shipping options under one roof. Each has its own pros and cons, and the best fit for you comes down to your sales volume and how complex your shipping needs are.
Most major UK couriers provide their own online portals for creating shipments, and they’re often a great, no-cost starting point for new businesses.
Using these tools is generally simple. You log in, your orders appear, you pick a service, and you print. The main drawback rears its head when you want to use a mix of couriers to find the best rate for different parcel sizes or destinations. Juggling several separate accounts quickly becomes a real headache, forcing you to constantly log in and out of different websites just to get all your orders out the door.
This is exactly where multi-carrier shipping software steps in to save the day. Platforms like ShipStation, Veeqo, or Shiptheory are built to solve the exact problem of managing multiple courier accounts. Instead of wrestling with several different systems, you get one unified dashboard for everything.
These platforms plug into both your e-commerce stores (like Shopify or WooCommerce) and all your courier accounts (Royal Mail, DPD, Evri, Parcelforce, you name it). When a new order lands in your store, it pops up on a single, central screen. From there, you can compare shipping rates between all your connected couriers in real time and pick the cheapest or fastest option for that specific parcel.
The core benefit here is a huge boost in control and efficiency. A good multi-carrier platform lets you manage 100% of your shipments from a single interface. It automatically imports order information and, once a label is printed, fires the tracking number straight back to your store and notifies the customer.
This consolidation is an incredible time-saver. Let’s say you sell a mix of small items that go cheaply with Royal Mail and larger, heavier products that are much more cost-effective to send with DPD. With a multi-carrier setup, you can process both types of orders in the same batch run without ever having to leave the software.
Once you’ve settled on your software, the final piece of the puzzle is getting it configured to work perfectly with your printer. This is where a lot of common frustrations with label printing pop up, but they are almost always easy to avoid. If you’re seeing misaligned prints, tiny text, or unscannable barcodes, it’s a safe bet that the issue lies in your software configuration.
The secret is simply to match the software’s output settings to your hardware.
1. Pick Your Printer Model: Go into the software’s settings and find the printer configuration area. Most reputable shipping platforms will have a dropdown list of popular printer models. Selecting your specific model (e.g., Zebra ZD421) will often apply the correct defaults automatically.
2. Define the Label Size: This is the most critical step. You have to tell the software you are using 4 x 6 inch labels. If it thinks you’re printing on an A4 sheet, it will generate a large PDF, which will then shrink and distort when sent to your smaller thermal label.
3. Check the Print Settings: When the print dialogue box appears, double-check that the ‘Scale’ is set to 100%. Resist the temptation to use ‘Fit to Page’ or any other scaling option, as this is a common culprit for distorting the barcode and making it unscannable.
Think of it this way: a Shopify store owner using a Zebra thermal printer would connect their shop to ShipStation. Inside ShipStation’s settings, they’d select their Zebra printer from the list and confirm the label format is 4×6 inches. From that point on, whenever they print a label, they just hit ‘Print’, knowing the output will be perfectly formatted every single time. This one-time setup eliminates the daily frustration of trial-and-error printing for good.
Getting a smooth, repeatable daily routine down is the real secret to stress-free shipping. It’s what transforms a chaotic pile of new orders into a straightforward, step-by-step process you can nail every single day. Having this kind of system in place not only guarantees accuracy and saves a ton of time, but it also builds the foundation you need to grow your business without getting bogged down.
The whole process kicks off the moment a new order lands in your e-commerce store. From that digital ping, it’s a series of practical steps that take you from an on-screen notification to a physical parcel, labelled and ready for the courier. Once you master this flow, you’ll find errors drop and your customers stay happy.
Your day probably starts by logging into your shipping software. If you’ve set it up right, it’s integrated with your shop, so all your new orders are already there, waiting in a tidy queue. The first thing to do is give them a quick once-over. Are there any special notes from the customer? Has the automated address checker flagged any potential issues?
Once you’ve reviewed the orders, you’ll need to confirm the package weight and dimensions. This is the key bit of information that determines which courier service to use. Your software should then show you all the available options, letting you pick the best-value service based on parcel size, weight, and how quickly it needs to get there. For instance, a small, light item will likely be cheapest with Royal Mail, whereas a heavier box might be better off with a courier like Evri.
This is where the magic really happens, especially when you have a lot of similar orders.
Instead of printing labels one by one, you can select a whole bunch of orders and print them all in one go. We call this batch printing, and frankly, it’s a massive time-saver for any growing business. What could take an hour becomes a job of just a few minutes.
The image below gives you a clear picture of the physical printing part of your daily routine.
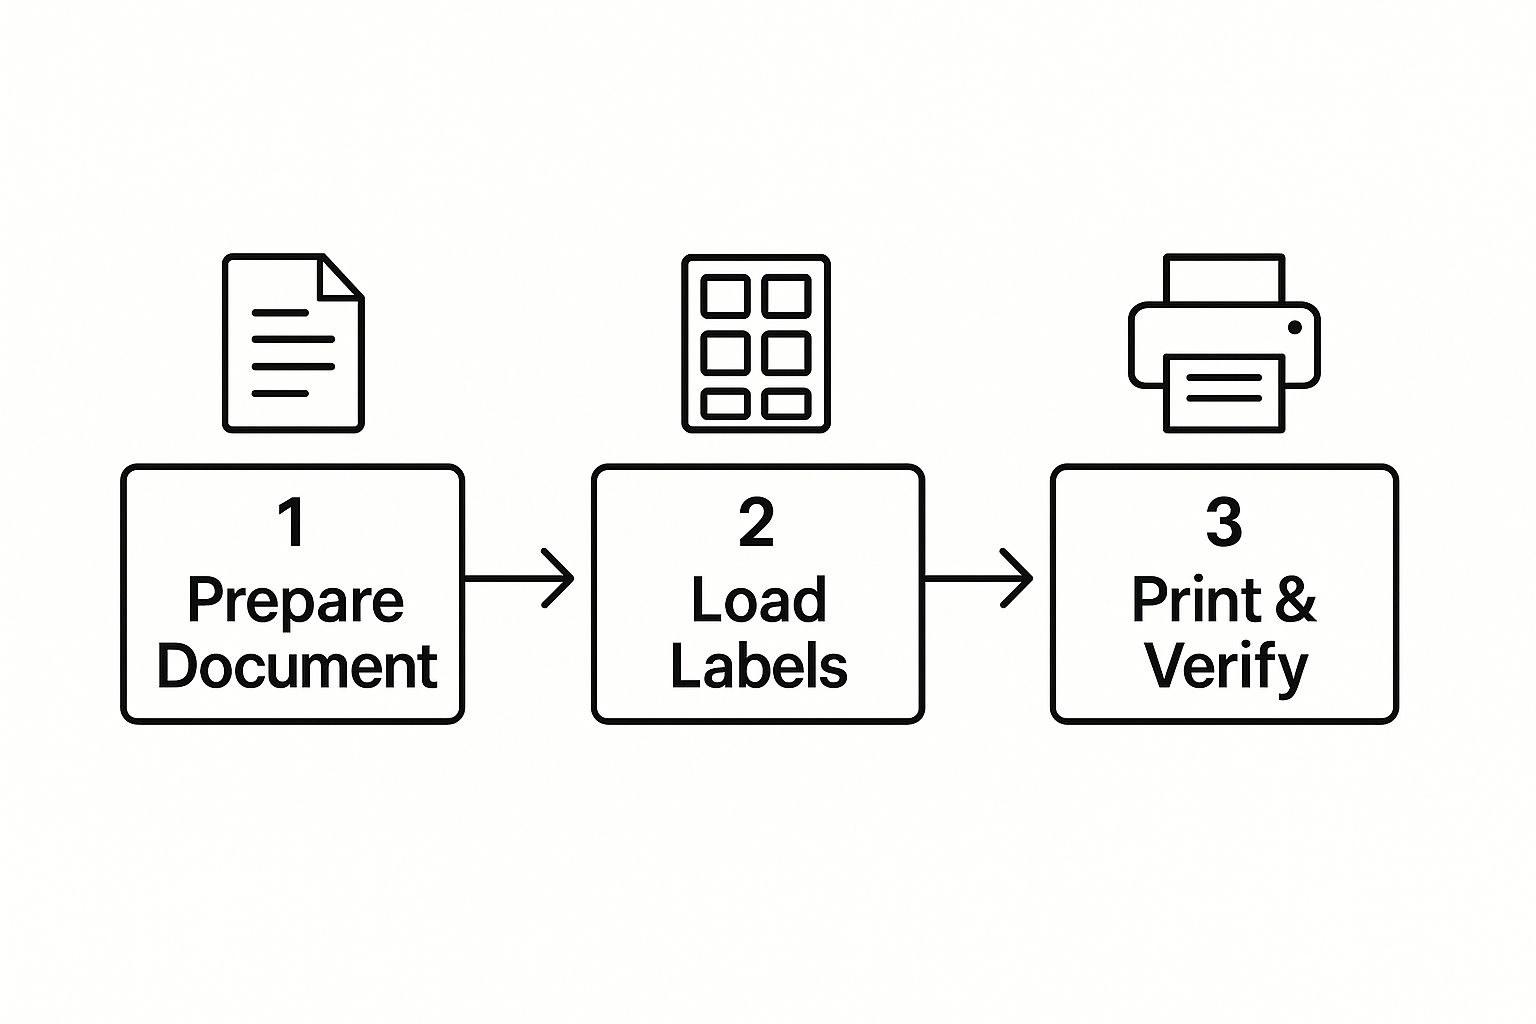
This simple flow-from preparing the document to checking the final label-is the backbone of an efficient printing setup. It makes sure every step is done right, every time.
After all the labels are printed and the parcels are packed, there’s one final, crucial step for many UK sellers: the end-of-day process. If you have a business account with couriers like Royal Mail, DPD, or Parcelforce, this is a formal requirement. It’s all about generating a manifest or collection summary.
This document does two important jobs:
Thankfully, most shipping software makes this incredibly easy. You’ll usually find an “End of Day” or “Run Manifest” button. Clicking it generates the summary document, which you just print out and hand to the driver when they arrive. Getting this step right is fundamental for keeping things running smoothly with your couriers.
As your business picks up steam, so will the number of parcels you need to send out each day. The boom in UK e-commerce means millions of parcels are flying around, all needing accurate labels for tracking and delivery. It’s a global trend, and it means having an efficient workflow is more critical than ever.
To cope with the increase in volume, you can start bringing in more automation. Many shipping platforms let you create rules that automatically assign a specific courier based on an item’s weight, its value, or where it’s going.
For a deeper look into improving your processes, this guide to automating document generation has some excellent strategies. If you’re thinking your current printer is struggling to keep up, our guide to choosing a shipping label printer can help you find a new machine that’s a better fit for your growing operation.
Once you’ve got the basics down, the real challenge begins: turning your simple printing setup into a genuinely productive fulfilment machine. This isn’t about working harder; it’s about working smarter. By introducing a few clever practices, you can slash the time it takes to get parcels out the door and drastically cut down on costly mistakes. As your business grows, these small efficiencies become the very foundation of a shipping operation that can handle increased demand without the chaos.
This need for efficiency is a direct result of the UK’s booming e-commerce and manufacturing scenes. In 2023, UK manufacturers’ product sales hit an impressive £456.1 billion, a 3.9% increase from the year before. That growth puts immense pressure on logistics, and at the heart of it all is the humble postage label. It’s the key to getting all those products into customers’ hands.
Your physical workspace has a surprisingly big impact on how quickly you can process orders. A messy, disorganised packing bench forces you to constantly hunt for supplies, wasting precious seconds on every single parcel. The secret is to create a logical, one-way flow.
Try arranging your station like a mini-assembly line. Start with your unpacked goods and empty boxes on one side. In the centre, keep your scales, tape dispenser, and label printer. Then, on the other side, create a clear space for finished, labelled parcels, ready to be dropped into the courier bag. This setup keeps everything you need within arm’s reach and minimises unnecessary movement.
Here’s a simple but incredibly effective habit: sort your orders before you even touch the print button. Most shipping software will let you filter or group orders by their shipping method. You can process all your “Royal Mail Tracked 48” orders in one block, then move on to your “DPD Next Day” parcels.
This approach delivers two massive benefits. First, it makes packing more efficient because you’re handling similar requirements over and over. Second, it dramatically reduces the risk of sticking the wrong postage label on a parcel—a frustrating and expensive error to fix.
By batching orders by courier, you create a rhythm. You know every label coming out of the printer for the next ten minutes is for the same service, which lets you work faster and with greater confidence.
To really ramp up your efficiency, it’s time to explore the automation features tucked away in your shipping software. Most platforms allow you to set up “if-then” style shipping rules that can automatically choose the right courier and package type for your most common orders.
These rules can be triggered by all sorts of criteria:
Setting up these rules automates the decision-making for your bread-and-butter orders. It eliminates endless manual clicks and guarantees consistency, no matter who on your team is packing.
A lightning-fast workflow is completely useless if your labels are unreadable. Poor quality control leads to unscannable barcodes, returned parcels, and angry customers waiting on delayed deliveries. Thankfully, two simple maintenance tasks can prevent most issues.
First, do a quick test print at the start of every day. This takes five seconds but confirms your printer is working perfectly before you run off a large batch. Second, make a habit of cleaning your thermal printer’s printhead. Over time, dust and adhesive residue build up, causing faint white lines to appear in your barcodes. A quick wipe with an isopropyl alcohol cloth every time you change a label roll is all it takes to keep your prints crisp and perfectly scannable. Our guide on choosing a thermal label printer for shipping has more tips on keeping your hardware in top condition.
Even when you’ve got your shipping process down to a fine art, questions will inevitably crop up. When you’re trying to fix a sudden printing glitch or just want to double-check a courier’s specific rules, getting quick, clear answers is key to keeping your parcels moving.
Let’s look at some of the most common queries we see from UK businesses. Getting these details right from the start will save you from headaches-and costs-down the line.
Yes, you can absolutely start out using a standard inkjet or laser printer. The most popular way to do this is with A4 paper that has integrated, peel-off labels. Most shipping platforms, including Royal Mail’s Click & Drop, can generate a PDF file formatted precisely for these sheets.
This approach is perfectly fine if you’re just starting out and sending a handful of parcels each week. It gets the job done without needing to invest in new hardware immediately.
The downsides are a much slower workflow and higher costs over time. Ink and toner cartridges are notoriously expensive, and the manual process of printing a full sheet, peeling off a single label, and sticking it on a box is far more time-consuming. As soon as your order volume starts to pick up, a dedicated direct thermal printer quickly becomes a smart investment for both efficiency and your bottom line.
The gold standard for shipping labels, recognised by virtually every courier in the UK and abroad, is 4 x 6 inches (roughly 10 x 15 cm). This size is the default for a very good reason: it gives you plenty of room for all the information needed for a parcel to get where it’s going.
This includes everything from:
Our advice? Stick with 4×6 inch labels. It simplifies everything. Your shipping software is already set up for it, and it guarantees you’re compatible with all the major players like Royal Mail, Evri, and DPD. It also makes buying supplies a lot easier, as 4×6 labels are the most common and widely available size.
While some couriers might support smaller formats, standardising on the 4×6 inch label will make your entire printing process much smoother.
An unscannable barcode is a frustrating but usually fixable issue. It typically comes down to one of three things.
Your first port of call should always be the print quality settings. If you’re using a thermal printer, the print speed might be too fast or the darkness setting too low. Try slowing the speed down and bumping up the darkness a notch in your printer’s driver settings. A dirty printhead is another common culprit, as even tiny specks of dust can create gaps in the barcode lines. A quick clean with an isopropyl alcohol wipe often works wonders.
Next, take a look at your labels. Cheaper, poor-quality labels can have a finish that causes the print to smudge or look fuzzy, making it a nightmare for scanners. It’s always worth investing in high-quality labels from a trusted supplier.
Finally, check that your software is generating the label correctly. If you’ve accidentally resized the image or your printer is using a “fit to page” setting, it can warp the barcode’s dimensions. Always print the label file at 100% scale to make certain the barcode maintains its integrity.
For businesses ready to move beyond manual systems, Sessions UK offers a complete range of industrial labelling machinery built for reliability and precision. You can explore our labelling solutions to find the right equipment for your production line.

Learn how an RFID clothing tag can streamline retail operations and boost inventory accuracy. Discover benefits and implementation tips today.

Discover how asset tracking labels work for UK businesses. This guide covers barcode vs. RFID, materials, and how to build your asset management system.

A practical guide to labelling glass jars. Learn about machines, adhesives, and UK compliance to get a professional finish for your products.
Copyright © 2026 Sessions Label Solutions Ltd.